
Watercolor Painting Tutorial PDF⁚ A Comprehensive Guide
Dive into the world of watercolor with our comprehensive guide! Whether you’re a beginner or looking to refine your skills, our tutorial PDF offers step-by-step instructions and expert tips. Explore techniques, color mixing, and create stunning artwork. Download now and unleash your creativity!
Welcome to the captivating world of watercolor painting! This art form, known for its delicate washes and luminous effects, offers a unique avenue for artistic expression. Watercolor’s transparent nature allows light to interact with the paper, creating a sense of depth and vibrancy that is hard to achieve with other mediums. Whether you’re a complete beginner or an experienced artist looking to explore a new medium, watercolor painting has something to offer everyone.

This introduction will guide you through the basics of watercolor painting, from understanding the materials to mastering fundamental techniques. We will explore the unique properties of watercolor paints, papers, and brushes, and how they interact to create different effects. You’ll learn about color theory, mixing techniques, and how to create beautiful washes and gradients.
Watercolor can seem intimidating at first, but with patience and practice, you can unlock its potential and create stunning works of art. So, gather your supplies, prepare your workspace, and let’s embark on this exciting artistic journey together! This comprehensive guide will provide you with the knowledge and skills you need to begin your watercolor adventure.
Essential Watercolor Supplies for Beginners
Embarking on your watercolor journey requires gathering the right tools. Don’t be overwhelmed; starting with a curated selection of essential supplies will set you up for success. First, invest in a basic watercolor paint set. Student-grade paints are affordable and perfect for practice. Opt for a set with a range of colors, allowing you to experiment with mixing.
Next, choose watercolor paper specifically designed to handle wet media. Heavier weight paper (140lb/300gsm) prevents buckling and warping. A watercolor pad or block is convenient for beginners. A set of round watercolor brushes in various sizes is crucial. Synthetic brushes are a budget-friendly option, offering good control and durability.
You’ll also need a palette for mixing paints; A plastic or ceramic palette with wells is ideal. Two water containers are essential⁚ one for rinsing your brush and another for clean water. Paper towels or a sponge are handy for blotting excess water and cleaning up spills. Finally, masking tape is useful for securing your paper to a board and creating clean edges. With these essential supplies, you’re ready to begin exploring the magic of watercolor painting!
Basic Watercolor Techniques⁚ Wet-on-Wet and Wet-on-Dry

Mastering the fundamental watercolor techniques of wet-on-wet and wet-on-dry unlocks a world of artistic possibilities. The wet-on-wet technique involves applying paint to paper that’s already wet. This creates soft, diffused edges and allows colors to blend seamlessly. It’s perfect for creating atmospheric backgrounds, dreamy landscapes, and flowing floral elements. Experiment with varying the amount of water on your paper to achieve different effects.
In contrast, the wet-on-dry technique involves applying paint to dry paper. This results in crisp, defined edges and allows for precise details. It’s ideal for painting intricate patterns, architectural elements, and realistic textures; Control your brush pressure and water ratio to achieve the desired level of detail.
Understanding the pigment and water ratios is crucial for both techniques. More water creates lighter, more transparent washes, while less water results in more intense, opaque colors. Practice both techniques to develop a feel for how the paint behaves on different surfaces. By combining wet-on-wet and wet-on-dry, you can create dynamic and expressive watercolor paintings.
Mastering Watercolor Washes⁚ Flat and Graded
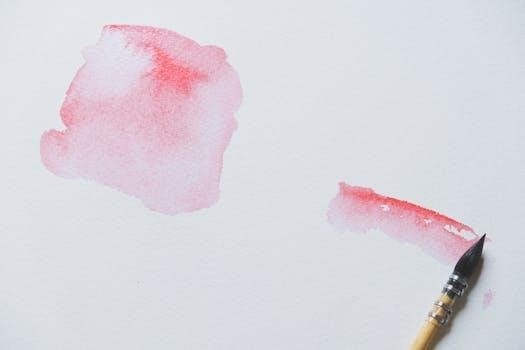
Achieving smooth, even watercolor washes is a foundational skill. A flat wash involves applying a consistent color evenly across a surface. This requires maintaining a wet edge and working quickly to prevent streaking or pooling. Tilt your paper slightly to allow the paint to flow downwards, and use a large, soft brush to cover the area efficiently.
A graded wash, also known as a graduated wash, involves transitioning smoothly from one color or value to another. This can be achieved by gradually adding more water to your paint mixture, or by layering different colors while they’re still wet. Practice creating subtle gradients in a single color, as well as more dramatic color transitions.
Many beginners struggle with splotchy washes or colors that are too light. To avoid these problems, ensure your paper is properly sized and use high-quality watercolor paper. Practice your washes on scrap paper first to get a feel for the paint consistency and flow. With patience and practice, you’ll be able to create flawless flat and graded washes that add depth and dimension to your watercolor paintings;
Color Mixing for Watercolor⁚ Starting with a Limited Palette
Embarking on your watercolor journey, a limited palette is a fantastic starting point for mastering color mixing. Instead of being overwhelmed by a vast array of colors, focus on understanding how primary colors interact. A classic limited palette consists of a warm and cool version of each primary color⁚ red, yellow, and blue. This allows you to create a wide range of hues, shades, and tints.
Experiment with mixing these colors to create secondary colors (orange, green, purple) and tertiary colors (red-orange, yellow-green, blue-violet, etc.). Pay attention to the ratios of each color you use, as subtle adjustments can significantly alter the outcome. Keep a color mixing chart to record your experiments and create a reference for future paintings.
Starting with a limited palette not only simplifies the color mixing process but also encourages you to develop a deeper understanding of color theory. As you become more comfortable, you can gradually expand your palette to include additional colors, but the foundation you’ve built with your limited palette will serve you well in creating harmonious and vibrant watercolor paintings.
Step-by-Step Watercolor Tutorials for Landscapes
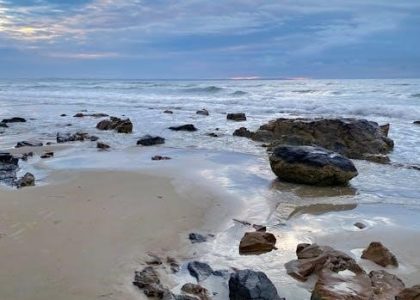
Unlocking the beauty of landscapes in watercolor becomes achievable with structured, step-by-step tutorials. These guides break down complex scenes into manageable stages, perfect for beginners and intermediate artists alike. Start by sketching a light outline, focusing on composition and perspective. Then, begin with a light wash of the sky, gradually building depth and color variations.
Next, tackle the distant elements like mountains or forests, using diluted paints for a hazy effect. As you move closer to the foreground, increase the color intensity and add details. Layering is key in watercolor landscapes, allowing you to create depth and atmosphere. Practice techniques such as wet-on-wet for soft, dreamy backgrounds and wet-on-dry for sharp, defined details in the foreground.
Tutorials often emphasize techniques for painting specific landscape features like trees, water, and rocks. By following these step-by-step instructions, you’ll learn how to capture the essence of nature and develop your own unique style in watercolor landscapes. Remember to experiment and adapt the techniques to suit your artistic vision.
Step-by-Step Watercolor Tutorials for Florals
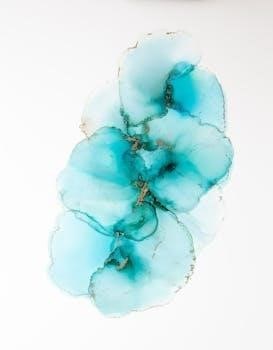
Embark on a vibrant journey of painting florals with watercolor through easy-to-follow, step-by-step tutorials. These lessons simplify the process, making it accessible for beginners while offering valuable insights for experienced artists. Begin by sketching the basic shapes of the flowers and leaves, paying close attention to composition and proportions. Then, start with a light wash to establish the base colors and values.
Gradually build up the layers, adding depth and dimension to each petal and leaf. Experiment with wet-on-wet techniques for soft, blended edges and wet-on-dry for sharper details. Tutorials often provide guidance on color mixing, helping you achieve realistic and vibrant hues. Focus on capturing the unique characteristics of each flower, from the delicate curves of a rose to the intricate patterns of a daisy.
Learn to paint various floral elements, including petals, leaves, stems, and buds. Pay attention to light and shadow to create a sense of realism and depth. With practice and patience, you’ll master the art of watercolor florals, creating stunning botanical artwork. Remember to adapt the techniques to your own style and preferences.
Painting Trees and Forests in Watercolor
Discover the techniques for painting lush trees and captivating forests using watercolors. Begin by understanding the basic structure of trees, including trunks, branches, and foliage. Practice sketching different tree shapes and compositions to develop your skills. Start with a light wash to establish the overall color and value of the scene. Gradually build up layers, adding details and textures to create depth and realism.
Experiment with various watercolor techniques, such as wet-on-wet for soft, atmospheric effects and dry brush for capturing the texture of bark and leaves. Learn how to paint different types of trees, from evergreens to deciduous trees, each with its unique characteristics. Focus on capturing the interplay of light and shadow to create a sense of depth and dimension within the forest scene. Consider the composition of your painting, using trees to create focal points and lead the viewer’s eye through the landscape.
Explore techniques for painting distant trees and forests, using lighter values and softer edges to create a sense of distance. Don’t be afraid to experiment with colors and textures to create a unique and expressive interpretation of the natural world. With practice and patience, you’ll master the art of painting trees and forests in watercolor, capturing the beauty and tranquility of nature.
Creating Expressive Animal Portraits with Watercolors
Embark on a journey to capture the spirit of animals through expressive watercolor portraits. Begin by selecting a high-quality reference photo with clear details and interesting lighting. Lightly sketch the animal’s outline, paying close attention to proportions and anatomy. Start with a light wash of color to establish the overall tone and mood of the portrait. Focus on capturing the animal’s unique characteristics, such as its fur, feathers, or scales.
Use layering techniques to build depth and dimension, gradually adding darker values to create shadows and highlights. Pay close attention to the animal’s eyes, as they are the key to conveying emotion and personality. Experiment with different watercolor techniques, such as wet-on-wet for soft fur and dry brush for capturing texture. Consider the background of your portrait, using it to complement the animal and create a sense of context.
Don’t be afraid to experiment with colors and styles to create a unique and expressive interpretation of the animal. Remember that practice is key to improving your skills, so don’t be discouraged by initial challenges. Embrace the fluidity of watercolor and allow it to guide your creative process. With patience and dedication, you’ll be able to create stunning animal portraits that capture the essence of your subjects.
Free Watercolor Resources⁚ Tutorials and PDFs
Unlock a treasure trove of free watercolor resources to fuel your artistic journey! Numerous online platforms offer a wealth of tutorials and downloadable PDFs catering to all skill levels. Explore comprehensive crash courses breaking down essential techniques, from brush handling to color theory; Discover step-by-step guides for painting landscapes, florals, and even expressive animal portraits, all readily accessible at no cost.
Many artists and educators share their expertise through video tutorials, offering visual demonstrations of various watercolor methods. Dive into lessons covering flat washes, graded washes, and color mixing, empowering you to master fundamental skills. Download free PDF workbooks packed with exercises and reference materials, providing hands-on practice to solidify your understanding.
Websites, blogs, and online art communities serve as valuable hubs for discovering free watercolor resources. Keep an eye out for special promotions and free access periods to premium content, expanding your learning opportunities. Embrace the abundance of free resources available, and embark on a rewarding path of watercolor exploration and skill development. Remember to check out resources by Terry Madden, Karen Rice and Ryan Fox.
Learning from Expert Watercolor Artists and Educators
Elevate your watercolor skills by learning from expert artists and educators who generously share their knowledge and techniques. Platforms like Udemy offer courses from fundamentals to advanced landscape and botanical painting. Explore the styles of self-taught artists like Sarah Stokes, known for her animal portraits, or delve into free tutorials from professionals offering tips and advice.
Discover artists such as Louise De Masi, Oliver Pyle, and Mind of Watercolor, who provide detailed videos with techniques and exercises. Many experts offer free resources, including newsletters with informative videos, as seen with Terry Madden’s Watercolor Workshop. Seek out tutorials from American Watercolor Society members, or even left-handed artists like Oliver Pyle, for unique perspectives.
Engage with online art communities and YouTube channels to learn from diverse artists. Benefit from step-by-step demonstrations, essential materials information, and color theory insights. By learning from experienced watercolorists, you can accelerate your progress and develop your own artistic voice. Explore online platforms like Patreon for exclusive tutorials from artists like Karen Rice Art.